Tales of Yore - Mappers Guide
Uploading Maps and Configuration
Welcome
Thank you for giving Tales a try and especially for trying out creating maps and adventures for the game. Mapping isn’t easy and relies on a lot of understanding of how the game works. Please be careful with your maps, mapping has great power and can do horrible things to game balance and server performance. Take it slowly and work out a pattern/workflow that works for you.
You can find a starter map and some sample configuration at:
https://talesofyore.com/tales-mapper-pack-0.3.zip
Again, appreciate your time and drop by the discord if you need any help.
Note that the tileset images get updated from time to time. The tilesets are available at the following links - please remember they are licensed for use as part of Tales of Yore only. The images should not be distributed or reproduced in any other capacity:
https://talesofyore.com/docs/tileset.png
https://talesofyore.com/docs/floors.png
Maps
The core component of a map in the Tales of Yore world is a tilemap created using LDtk.io. It’s an amazing tool and has provided the easiest way to create maps I’ve ever seen. Within the mapper pack you’ll find a sample LDtk file that’s already set up with the appropriate configuration for use in Tales.
Each map is split into levels and each level has a series of tile map layers and an entity layer. The tiles are the visuals of the zone in the game. The entities describe capabilities and functions in the game.
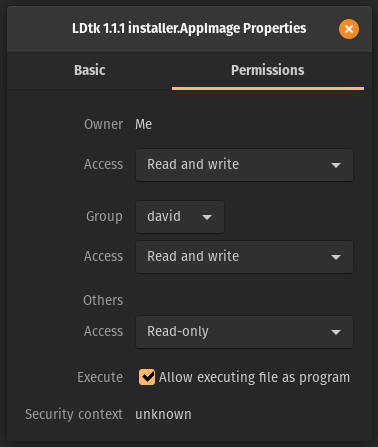
Note that for Linux computers LDtk will download as an AppImage file and will need to be made executable by right-clicking on the file, choosing Properties and then clicking on the Permissions tab and finally checking the Execute box to “Allow executing file as program”
Layers
Each map has several layers. These layers should not be changed since the game expects them to in the order that is defined in the sample map file. The layers are described below:
Entities | This is a list of behaviour indicators. These are described in the description below. |
OverAll | Tiles placed on this layer are always drawn above the player. This layer can be used for things that are above the player level - the tops of tents or floating things for instance. |
InfrontAndBehind | Tiles placed on this layer are always shown in front of the player when they’re behind it but behind the player when they’re infront of it. This is used for places where the player should go behind the scene (arches, backs of builds, tops of trees etc) |
Objects | Objects are anything that block that isn’t a wall. Object tiles are different to walls in that a player can target them and move towards them. Used for things like furniture and chests. |
Decal | Decals are items that are placed on the floor that the player can walk over. This can be used for flowers, paths etc. |
Walls | Walls are as you’d imagine, walls. Tiles on this layer block movement. Note that there are two special tiles that can be placed on this layer. This tile won’t be visible in game but blocks movement and shooting.
This tile won’t be visible in game but blocks movement. However it still allows shooting through it. |
Floor | This is the base layer on which the player moves around. There is a specific tile set for this layer. |
Reflective | This is a special layer on which things like water can be placed. This layer is drawn before the player and then the player is flipped vertically and drawn onto it at half transparency. This gives the effect of reflections in anything on this layer. Use sparingly. |


Special Tiles
There are some “special” tiles which have specific behaviour in game.
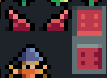
Animated
Some tiles, like torches, flags etc are animated. In these cases you’ll see the animation frames running across the tileset. Always use the first (furthest left) tile when placing it into the map.
Torches for example:

Switches/Doors
There are several types of switches in-game, including levels and pressure plates. These are for use in instance dungeons. The colour of the switch tells you which type of door it links to. All switches or pads must be active for the door to open. While these should work in non-instance dungeons this hasn’t been tested.
Note that switches must be on the Object layer. Doors must also be on the Object layer. Pressure plates must be on the Decal layer.
Switches/Pads | Doors |


Teleporters
Teleports do as they suggest, they move a player from one location to another. Note that teleporters must be placed on the Decal layer
Teleporters are again colour coded:
Teleport From | Teleport To |


Magic Bridge
It’s also possible to add magic bridges. These appear once all the gold switches or pads are set. On the Object layer place the following tile where you want the bridge to appear:

Currently Magic Bridge tiles are rendered above the Floor layer; a feature request has been submitted to move them to above the Decal layer for multi-level floor designs.
Entities
Mob | A monster or animal placed in the game |
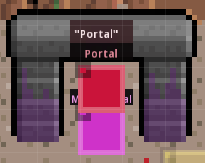
Portal | A link between one zone and another |
NPC | A non-player character in the game. |
Effect | A special effect that can be placed in the game |
Light | A light source in the game |
Bank | A location where the player can access their bank vault |
Safe | An indicator that a location is safe and can be used as a restore point should the player die. |
Mark | Used for demos. |
Book | A location where a player can read a book. |
Magic Portal | The glowing purple portal that appears when the player is close. |
Mob
A mob is a “mobile” monster or animal placed in the world.
type | The type of the monster or animal to spawn. This should be one of the “key” values from the list here: |
spawnOnce | The monster should only be spawned once. Always true for instance dungeons. |
onDieOpenDoors | True if this is the gatekeeper to a door. When this monster dies we should open the doors. |
Portal
A portal forms a link between two zones or levels. The portal has a name and describes the remote portal that it links to. It also describes the transition between the two.
TargetLevel | The name/ID of the target level |
Target | The name of the portal in the target level to link to |
Name | The name given to this portal in the context of this level |
ArriveX | The relative X offset from the top left of the portal the player should arrive at when entering through this portal. Don’t let this overlap the portal or you’ll end up in a loop. Note that positive values place the player to the right of the top-left square of the portal. |
ArriveY | The relative Y offset from the top left of the portal the player should arrive at when entering through this portal. Don’t let this overlap the portal or you’ll end up in a loop. Note that positive values place the player below the top-left square of the portal. |
Sound | The sound to make during the transition. See the following JSON for a list: |
If | Check a condition using the script interface. This portal will only work if this condition is true. |
FailMessage | The message to show if the condition for the portal isn’t true. |
OpenDoor | Should all the doors on the level open when this portal is used. This is useful for coming back up through instance dungeons. If the player had to use switches on the way in, they may not be able to reach them on the way back. Set this to open all the doors on the portals going back up through the level. |
Message
A message to be shown when a location is examined. Note that this will not work where a wall tile is set.
message | The message to show |
NPC
A non-player character that is placed in the world. The ID should reference the npc.json file that you will configure as part of the map.
id | The ID of the NPC in your npc.json file |
Effect
A visual effect placed at the given location. These are very limited at the moment.
type | The type of effect to place. Values are limited to “smoker” atm used for chimneys. |
Light
Place a light source in the game. No lights are assumed from tiles so you need to place a light for every torch for instance.
type | The type of light shape to use. There are two values, down and round down - a light source like a torch on a wall, the light goes down in a semicircle. round - a circle of light like from a campfire or lantern. |
Bank
A location the place can use to access their safe deposit box. This shouldn’t be used on custom maps.
Safe
A token indicating that a given level is marked as a safe place. If this was the last safe place a player was at before they died they return to this entity.
Book
A location at which the player can read a book. Books can only be defined in the central library at the moment.
name | The name of the book to read. The list of names can be found at: |
Magic Portal
A magic portal is a spinning purple portal that only appears when the player is near it. The portal is only a visual effect and requires an overlaid Portal entity to actually go anywhere.
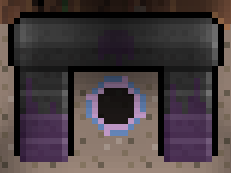
Note that the Magic Portal entity should be placed 1 tile below the associated portal for the visual effect to appear in the correct location, e.g.:
Level Properties
You can find the level properties for any given level/zone under this in LDtk:
Music | The music to play for this level. The list IDs to use case be found in: |
Sounds | Atmosphere sound effects to play |
MusicVolume | Optionally adjust the music volume in this level |
Clouds | True for clouds floating over the scene |
Mist | True for mist flowing over the scene |
Lighting | True to enable lighting in this area |
Ambient Light | Indicates how bright the light is where there are no lights in a level with lighting turned on |
Indoor | Indicates that an area is indoor and so day/night and weather shouldn’t be applied. |
name | The name to display on entering the zone |
instance | True for instance dungeons - this is a bit wooly at the moment. Be carefully. |
discovery | Indicates whether a player should see the whole map on entering or only discover areas as doors are open. |
NPCs and Scripting
NPCs are added to the world using the NPC entity in the map as described above. The NPCs themselves are defined in JSON files.
Defining NPCs
NPCs are catalogued in a single JSON file named npc.json. It consists of set of entities, each representing the visual characteristics of the NPC and then linking to a JSON scripting file for their conversation pages and behaviours.
The npc.json catalog takes the form:
{ |
The ID used for the element is the ID that should be referenced in the NPC entity in the map. So in the example above, the map entity would reference “mary”. The rest of the fields are described below:
id | The ID of the NPC. This should match the outer ID. |
name | The name to display for the NPC |
subtitle | The job or role that the NPC plays in the game. |
type | The base type of the graphic to display. Options are: human-white human-asian human-black orc
|
hair | The hair displayed or ‘none’. The hair takes the form: hair-<colour>-<style> Where colour is one of: "black","white","orange","blonde","brown","green" Where style is one of: "short","quiff","coder","beard","long","ponytail","crazy","tache","chrono" |
facial | Optional. The facial hair displayed. The facial hair takes the form: facial-hair-<colour>-<style> Where colour is one of: "black","white","orange","blonde","brown","green" Where style is one of: "coder", "beard", "tache" |
items | A list of item IDs that the NPC will be dressed/hold/wear. The list of item items can be found at: https://talesofyore.com/play/items.json Note that above items will be held in their inventory, not displayed. The following options are available as items than an NPC can be displayed holding visually on screen: visual-beer visual-hammer visual-pickaxe |
voice | The voice to play when the player talks to the NPC. One of “maleX” or “femaleX” where X can be 1 to 8. |
location | The world location of the NPC. For the purposes of custom maps this should always be set to “other”. |
action | The action to take when the player interacts with this NPC. For the purposes of custom maps this should always be “script” and this causes the game to look for a script file named <id>.json, where <id> is the ID of the NPC. These script files are described below. |
Scripting NPCs
Each NPC requires a script. The script file should be named <id>.json where the <id> is the ID of the NPC being defined.
Script files declare pages, and each page represents a page of dialogue shown to the player. Script files can also take actions and apply game logic using the ScriptContext (defined below).
A simple NPC script looks like this:
{ you build something great!", to Mary in the cave?", |
The above script has two pages and has a tiny quest in it. If the player isn’t holding a deer skin they’ll be asked to perform a job. If they accept it they’re given a deer skin to deliver.
The first is the introduction page where the NPC says hello. That page has two options.
The first labelled “job” is optional and only appears if the condition !this.hasItem(‘deerskin’,1) is true, or rather it only appears if the player does not have at least one deerskin. If the player selects this option we send them to the second page.
The second labelled “bye” is always present and is our exit clause. It has the field close set to true.
The second page describes the job. If the player selects ‘job’ of the first page then they gotoPage(‘job’). It has two options.
The option labelled yes allows the player to take the quest. If they select this we give them the deer skin to deliver with this.getItem('deerskin', 1). Then we close the conversation.
The second labelled no allows the player to opt out of the quest. We just close the conversation at this point.
If you look in the mary.json script included in the mappers pack you can see the other half of this delivery quest. We use the item’s presence as the indicator here so the quest can be repeated as many times as we like. We could however use global variables to set a flag on the player account so they could only complete the quest once.
To have an NPC offer items for sale include a page such as:
{ |
Similarly, to have an NPC offer to buy items from the player include a page such as:
{ |
The following sections describe the different parts of a script file.
Script
The top level script file.
pages | An array of Page objects |
Page
A single page of dialogue.
id | The identifier for the page |
text | The text to be displayed for the page |
options | The list of Option objects to be displayed for this page. More than 4 will break the user interface - so don’t do that. |
Option
An option that is presented to the player.
text | The label text displayed to the user. Keep this short there isn’t much room on the buttons. |
if | Optional condition based on the script context (defined below) that must resolve to true for the option to be available. |
exec | Optional script to invoke when this option is selected based on the script context (defined below) |
close | True if this option should close the conversation when selected. |
The Script Context Interface
The following interface is supported as the “this” context when in conditions or in actions.
export interface ScriptContext { pushAwayFromTarget(distance: number): void; pushTargetAway(distance: number): void; stop(): void; clearTarget(): void; attractTarget(): void; play(soundName: string): void; eat(timeInMins: number): void; mana(amount: number): boolean; rage(amount: number): boolean; focus(amount: number): boolean; heal(amount: number): boolean; doneQuest(questId: string): boolean; healTarget(amount: number): void; focusTarget(amount: number): void; manaTarget(amount: number): void; effect(name: string): void; effectTarget(name: string, delayed: boolean): void; gotoPage(id: string): void; log(msg: string | undefined): void; setVar(key: string, value: any): boolean; getVar(key: string): any; getGold(amount: number): void; takeGold(amount: number): void; takeItem(itemType: string, quantity: number): void; getItem(itemType: string, quantity: number): void; getRecipe(recipeId: string): void; hasItem(itemType: string, quantity: number): boolean; hasOrBankedItem(itemType: string, quantity: number): boolean; completeQuest(questId: string): void; startQuest(questId: string): void; call(execScript: string): any; modifyTarget(name: string, duration?: number): void modifySelf(name: string, duration?: number): void modifyParty(name: string, duration?: number): void isSubscriber(): boolean; hasGold(amount: number): boolean; teleportToTarget(): void; moveTo(targetName: string, targetLevel: string, targetNamespace: string | undefined): void; isHero(): boolean; hasVisited(name: string): boolean; hasRead(name: string): boolean; applyAtTarget(range: number, effect: (actor: any) => void): void; speak(message: string): void; knowsDialect(dialect: string): boolean; learnDialect(dialect: string): void; hasEquipped(def: string): boolean; showMessage(message: string): void; } |
play
Play a sound effect from the list at https://talesofyore.com/play/sounds.json
Arguments
soundName - The name of the sound to play.
eat
Cause the player to eat, and be hungry in the given number of minutes.
Arguments
timeInMins - The minutes of not being hungry the player should have.
mana
Adjust the mana of the player by the given amount
Arguments
amount - the amount of mana to apply
heal
Adjust the hit points of the player by the given amount
Arguments
amount - the amount of hit points to apply
healTarget
Adjust the mana of the player by the given amount
Arguments
amount - the amount of mana to apply
gotoPage
Move to a different page in a dialogue with an NPC.
Arguments
id - The ID of the page to move to
setVar
Set a global player variable. This is stored in the player save so persists between sessions.
Arguments
key - the ID of the variable to set
value - the value to set in the variable
getVar
Get a global player variable.
Arguments
key - the ID of the variable to get
Returns
The value in the variable or undefined
getGold
Give the player some gold.
Arguments
amount - the amount of gold
takeGold
Take some gold from the player.
Arguments
amount - the amount of gold
takeItem
Take an item or some items from the player.
Arguments
itemId - the ID of the item to take
quantity - the number of the item to take
getItem
Give an item or some items to the player
Arguments
itemId - the ID of the item to give
quantity - the number of the item to give
hasItem
Check if the player has a given item
Arguments
itemId - the ID of the item to check
quantity - the quantity to check for
Returns
True if the player has that quantity or more of an item
hasOrBankedItem
Check if the player has a given item either in their bag or in the bank
Arguments
itemId - the ID of the item to check
quantity - the quantity to check for
Returns
True if the player has that quantity or more of an item
completeQuest
Complete a quest. If you want to add quests please provide details of the quests so it can be added to the global quest list.
Arguments
questId - the ID of the quest to mark as complete
startQuest
Mark a quest as started. If you want to add quests please provide details of the quests so it can be added to the global quest list.
Arguments
questId - the ID of the quest to mark as started
hasGold
Check if the player has an amount of gold
Arguments
quantity - the quantity to check for
Returns
True if the player has that quantity of gold or more
Chests
If a file named chests.json is added to the map this will be used to identify the contents of a chest. The file is a map from place name to a list of chests definitions, for example:
{ |
The x/y location relates to the location of the chest on the specified map/level file where the top-left square of the map has an x and y value of 1. The time is the respawn interval in minutes. The gold is a range of gold that could be found. Finally, lootItems describes the items it's possible to find in that chest along with the chance to find it.
Interactive Entities
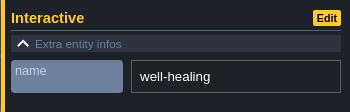
Interactive entities are a newer feature and will require their entity type added within LDtk prior to use for older mapping packs:

If a file named interactive.json is added to the map this will be used to identify entities with additional interactions. The file references the entity name and defines which effects should take place when interacted with; for example:
{ "well-healing": { this.effectTarget('healEffect'); this.speak('I feel better now!');" } |
With above script place an entity with type Interactive on the map and name it well-healing to match the script object:
The entity can be any size; one tile or larger. In game it should show a magnifying glass when hovering mouse over top and when clicked will run the script.
Simple message-type entities are also possible:
{ "well": { } |
Note that interactive entities can be placed over impassable objects however at least one side should be reachable by the player, e.g., you can place it on a wall to make the interaction trigger.
Items
Item IDs reference the global list of items. The IDs for these items can be found at:
https://talesofyore.com/play/items.json
Monsters
Monster/Animal IDs reference the global list of monsters. The IDs for these items can be found at:
https://talesofyore.com/play/allmobs.json
Uploading Maps and Configuration
The service for uploading maps can be accessed at:
https://node3.cokeandcode.com:8444/maps
You will need a username and password provided to you by Coke and Code.
To test the maps you’ll need to use the staging server accessible here:
https://talesofyore.com/staging
The staging server is regularly updated and the DB synced with the production server.
To upload a map for test you need to add the following files:
map.ldtk | Your LDtk Tilemap |
npc.json | The catalog of the NPCs in the map |
<id>.json x N | A bunch of script files, one for each NPC |
chests.json | The catalog of chests in the map |
interactive.json | The catalog of interactive entities in the map |
Please be careful with what you upload and how big everything is. Every time you upload a file into your map anyone currently connected to it will be kicked and have to reconnect to the server.
Note that map.ldtk may need re-uploaded after uploading json files for changes to take effect.
Testing Maps
Once your map is uploaded you can test it on the live server. This may change if there is abuse but for right now it’s costly to run a separate test server.
You need to have mapper permissions on the server. Again this is a request to Coke and Code.
Once you have mapper permissions you have two additional chat commands:
/test <mapper-name> | Test the map created by the mapper specified. Note that the mapper-name is your map upload username and not your Tales account username. This means that other mappers can test your maps too. |
/untest | This teleports you out of your map and back to a safe location in the main game. You can optionally do this while you upload new files. If not you’ll get kicked and have to reconnect. |
/quests | Display the name of the quests against their variable name. |
/getvar | Get the value of a variable for the current player |
/setvar | Set the value of a variable for the current player |